Getting Started
Have you already installed NEST?
Then let’s look at how to create a neural network simulation!
NEST is a command line tool for simulating neural networks. A NEST simulation tries to follow the logic of an electrophysiological experiment - the difference being it takes place inside the computer rather than in the physical world.
You can use NEST interactively from the Python prompt, from within IPython or in a Jupyter Notebook. The latter is helpful when you are exploring PyNEST, trying to learn a new functionality or debugging a routine.
How does it work?
Let’s start with a basic script to simulate a simple neural network.
Run Python or a Jupyter Notebook and try out this example simulation in NEST:
Import required packages:
import nest
import nest.voltage_trace
nest.ResetKernel()
Create the neuron models you want to simulate:
neuron = nest.Create('iaf_psc_exp')
Create the devices to stimulate or observe the neurons in the simulation:
spikegenerator = nest.Create('spike_generator')
voltmeter = nest.Create('voltmeter')
Modify properties of the device:
nest.SetStatus(spikegenerator, {'spike_times': [10.0, 50.0]})
Connect neurons to devices and specify synapse (connection) properties:
nest.Connect(spikegenerator, neuron, syn_spec={'weight': 1e3})
nest.Connect(voltmeter, neuron)
Simulate the network for the given time in miliseconds:
nest.Simulate(100.0)
Display the voltage graph from the voltmeter:
nest.voltage_trace.from_device(voltmeter)
nest.voltage_trace.show()
You should see the following image as the output:
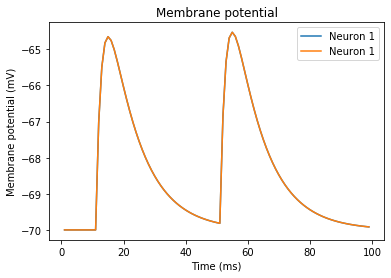
And that’s it! You have performed your first neuronal simulation in NEST!
Want to know more?
Check out our PyNEST tutorial, which provides full explanations on how to build your first neural network simulation in NEST.
We have a large collection of Example networks for you to explore.
Regularly used terms and default physical units in NEST are explained in the Glossary.